Al Dente Homemade Pasta Recipe with Kitchenaid Pasta Attachment
Whether it's your first time making it or you're a pasta expert, making your own pasta is a revelation because it's way easier than you might think. Here is your guide to making and cooking perfect al dente homemade pasta with step by step instructions for first mixing it by hand then rolling and cutting it with a stand mixer pasta attachment. Your Italian red sauce will swoon with delight.
Servings 4
Ingredients
- 2 ⅓ cups 00 flour I use King Arthur's Pizza Flour; see below
- ⅔ cup semolina flour I use Bob's Red Mill semolina flour
- 3 egg yolks + 2 eggs
Instructions
Prep the pasta attachment
- Lift the round KA logo and loosen the bolt on the right side of the logo to create enough space to accept the pasta roller. Fit the end of the roller into the opening and tighten the screw. You might have to turn the roller ¼ turn to fit.
Mix the pasta dough
- Combine the flours in a bowl until thoroughly combined. Reserve 1 cup of flour. Pour the flours onto a clean cutting board or countertop in a mound. Make a well in the center of the flour using the bottom of a measuring cup, leaving flour at the bottom. You don’t want to see the cutting board.Beat the eggs in a bowl (or if you forget like I did, that’s ok!) Pour the beaten eggs into the well.2 1/3 cups 00 flour, 2/3 cup semolina flour, 3 egg yolks + 2 eggs
- Use a fork to pull flour from the sides into the egg, whisking the flour into the eggs. Keep working the flour into the egg until you don’t see any runny egg. Surround the dough with your hands and bring it together making a ball.
- Add enough water (a tablespoon at a time) to make a smooth dough. Keep rolling the dough, adding more flour as needed. Don't worry if you don't use all the flour. The amount might fluctuate based on the weather.
- Roll the dough by pulling it towards you, make a quarter turn, and push it away.
- Keep pulling in more flour as needed. You might need as much as a cup more! Keep rolling until the pasta dough is smooth.
- Lightly flour the dough and allow it to relax, covered with a damp dish towel or wrapped in plastic wrap for 15-20 minutes.
- Cut the pasta dough into 4 equal pieces. Work with one piece of dough and return the other three to plastic wrap or cover so as not to dry out.
- Flatten the pasta dough into a rectangle about 2” smaller than the width of the pasta roller, about ½”thick. Your dough might look a little "salty" from the semolina. This will smooth out.
- Turn the dial on the roller to “1” which is the widest setting. Turn on the mixer to “low”.
- Place the short end of the dough into the opening of the pasta roller and allow the power of the pasta roller to pull the dough through the machine. Catch the dough on the other side of the roller.
- “Book” the dough, which means folding each short end towards the middle. Book the dough one more time and run the dough through the pasta roller at setting #1 again.
- Now, turn the knob to “2” and run the dough through the machine.
- Repeat running the dough through the machine to 4-5 for fettuccine, spaghetti or linguine. The piece of dough is going to get longer and longer. You can cut it crosswise if needed for shorter noodles. Run the dough through the machine to the desired thickness.
- Place the short end of one piece of dough into the end of the cutter with one hand holding the other end of the dough upright. Turn on the machine to low and allow the machine to grab the dough pulling it through and cut it.
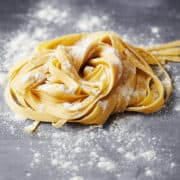
- Loosely wrap the dough into a “nest” and place on a floured baking sheet and sprinkle the cut pasta with more flour. Repeat with the rest of the dough. The dough can sit out for a couple of hours, covered, as needed if you're cooking the same day.
Cook the pasta
- Bring a stockpot of water to a rolling boil. Season generously with kosher salt (generous means a handful!).
- Gently add the pasta to the pot, one nest at a time.
- Lightly stir with a wooden spoon and cook for 2-3 minutes until the pasta is al dente. Test one piece. It should have a firm bite and not be mushy. You’ll know!
Notes
Flour notes
- You may not use all the flour as it depends on the weather.
- If you only have access to all purpose flour, that's ok to substitute it for the "00" flour but do not substitute for the semolina.
- I typically use AP flour to dust my board.
