

If you’re like me, you have grilled, baked, poached and crock-potted (a new word I’ve coined) more than your fair share of chicken breasts, with not consistent or sometimes dry and stringy results. I feel your pain! One day, I took to my internet machine and literally stumbled upon a pan seared chicken breasts method from The Kitchn that has changed the way I (and soooo many J+N readers) have learned to cook really juicy chicken breasts.
All that’s needed is 2 minutes of prep work and the other 21 minutes are just managing a timer while the chicken breasts cook. Easy, right?
I have used and made this recipe literally hundreds of times in dozens of ways, whether it’s a one pan chicken pasta or sweet and savory chicken sandwich.
Before I share the whole process, I have to lay down some ground rules.
Must follow guidelines
There are a few pan cooked chicken breast “rules” you must follow to be successful:
- The chicken must be flattened or thinned out.
- NO peeking once the lid is on the skillet.
- Once more for the crowd in the back: NO PEEKING!
This post contains links to affiliate websites including Amazon. I make a small commission for any purchases made using these links. Thank you!
How to make pan seared chicken breasts


Save This Recipe!
What you’ll do/need
- Pat dry your chicken breast with paper towel and lay it on one side of a double length of parchment paper (enough to cover the chicken on top). Take the remaining half and pull it over the chicken to cover like a book.
- Use either the flat side of a meat tenderizer/pounder or a skillet and POUND the chicken breasts. (Note: this is better than therapy).
You are trying to even them out so that the thickest portion is closer in depth to the thinnest. The chicken will grow quite a bit but don’t go too crazy because they have to fit in the pan.


The juicy chicken breast cooking method

Now it’s time to remember those guidelines laid out above.
After the 21 minutes have passed, you’ll remove the lid to the most beautiful, luscious cooked chicken breasts. I dare you not to eat a bite or two.
Residual chicken broth uses
I love two-fers. And this chicken breast cooking method is one of them. Because it not only produces really moist chicken breasts, it also produces a rich broth that you can use for other recipes.
I save it and freeze it in a ziploc. Or toss into a super quick chicken pastina soup. There are so many uses for it. You can even add a little butter and white wine to make a sauce to serve the chicken over rice or pasta with some seared broccolini.
Do you have a favorite recipe that would work with Foolproof Chicken? Make it and let us know in the comments!

Made this recipe?
I’d love it if you’d share your review and leave a star rating and comment!
21 Minute Pan Seared Chicken Breasts
SAVE THIS RECIPE
Ingredients
Tools: wax or parchment paper, a meat tenderizer, a cast iron or metal skillet
Instructions
- Between two pieces of parchment wax paper, pound chicken breasts with tool of your choice until even across the top. You want them to be of consistent thickness. They should get quite large.
- Salt and pepper one side of chicken – don’t be shy w/the pepper especially.
- Meanwhile, heat 1 tablespoon of olive oil or a large drizzle in a large skillet over medium high heat (I recommend cast iron or stainless over non-stick)
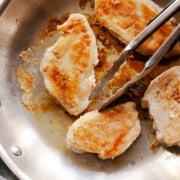
- Place the chicken breasts, seasoned side down, into pan. Don’t crowd the pan – you want to get a nice sear – not a steam.
- Quickly season the tops of the chicken and cook for one minute.
- Flip to the other side (they should release cleanly if your pan is heated properly).
- Reduce the heat to a low simmer, cover the pan with a tight lid and cook for 10 minutes. DO NOT REMOVE THE LID ANY TIME DURING THIS STEP!
- Turn off the heat and cook for an additional 10 minutes. I REPEAT: DO NOT REMOVE THE LID ANY TIME DURING THIS STEP!
- That’s it!


A friend of mine who is Italian just sent me this recipe, so I haven’t made it yet, but I certainly will! She raves about this recipe and makes it often.
One question: In the last step, when you say to leave the lid on the pan, turn off the heat and let it cook for the final 10 minutes, should I remove the pan from the burner, even though it’s turned off? My electric stove stays a little warm and I don’t want the chicken to get overcooked. I’m thinking I could just move the pan over to a burner that is cool, leave the lid on and let it sit for the final 10 minutes. Or, should I leave it on the burner, even though it’s turned off? Thank you so much!
Such a good question! Yes, leave the pan on the burner. While I don’t have an electric stove, my burner stays warm as well as it’s made of cast iron and conducts major heat. I know my kids have had electric stoves and they use this recipe all the time. The chicken won’t burn because of all the moist air and pan juices already in there working their magic. Please let me know how it works and I am going to add this tip per your suggestion to the recipe card. Thanks for asking 😊
Thank you for your speedy response, Lori! I look forward to trying this recipe very soon!
Petunia53
The fact that you felt the need to share this, Lori, tells me I’m not the only one who always dries out the chicken – but never again! This method is so simple, quick, easy … and BEYOND PERFECT! I used the chicken to make chicken salad, a favorite I’ve always failed at because the heart of it all, the chicken, as never right; even Duke’s Southern Mayo couldn’t save it. I no longer have visions of perfect chicken salad but rather the assurance toofit. And did I mention, BEYOND PERFECT!
Yay Denise! I’m so happy! This is my favorite way of making chicken and I probably make it once or twice a week. If you haven’t tried my chicken salad yet, give it a go…and I use Duke’s Mayo too! Thanks for taking the time to share- I really appreciate it!😊
Lori,
I think I understand what you mean but please clarify two things:
1. Earlier in the ARTICLE when you are describing the steps you say, “Lower the heat to a simmer and re-set the timer for 10 minutes.
After one minute, flip the chicken breasts over. Grab a tight fitting lid, put it on the pan and leave it there. I repeat: LEAVE IT THERE.
Re-set the timer for another 10 minutes.” I think I’m supposed to leave it for 10 minutes instead of one minute, since I just set the timer for the first 10 minutes. Is that right?
2. In the RECIPE you say, “Flip to the other side (they should release cleanly if your pan is heated properly).
Reduce the heat to a low simmer, cover the pan with a tight lid and cook for 10 minutes. DO NOT REMOVE THE LID ANY TIME DURING THIS STEP!
Turn off the heat and cook for an additional 10 minutes. I REPEAT: DO NOT REMOVE THE LID ANY TIME DURING THIS STEP!
That’s it!”
Am I really suppised to turn iff the heat for the last 10 minutes?
Thank you in advance for your help.
Hi Caroline, I apologize for any confusion with the “reset” in the post and appreciate your catching it! It’s fixed now!
After you have seared the chicken on one side for one minute (it should release cleanly) flip it over to the other side. Lower the heat, put the lid on and set the timer for 10 minutes.
After the 10 minutes are up, reset the timer for another 10 minutes and turn off the heat on the burner. Leave the lid on and the chicken will continue to cook off the heat.
After the second 10 minutes, you can remove the lid and you should have beautifully cooked chicken.
Hope that makes sense. It’s 21 minutes total which includes one minute of searing on the first side, 10 minutes of cooking on the other side with the heat and the lid on. And then the final 10 minutes with the lid on without any heat whatsoever.
Please let me know if you have any more questions and I’ll go back in to the post and re-review my instructions to make it as clear as possible.
Thank you so much for asking! I really appreciate it!
perfect every time! thank you! This is now my time to 😀
Yay Gretchen! Thank you so much!
Lori, This recipe is the best! I’ve made it frequently now and it’s the only way I will cook my chicken breasts from now on! I double the recipe and use the leftover cold chicken for salads! My grandkids love it!
Thanks so much Kim! It prob hands down is the one recipe that I have taught to more college kids and the friends who have taught their kids because it’s literally foolproof. I use it for everything from chicken salads to enchiladas to pastas! 😊 Thank you for sharing
easy and fantabulous!!! I used parchment bags so it’s a quick clean up and no splattering chicken juice!!!
Thanks so much Jessica! Such a good idea to use parchment paper bags – I haven’t used those and you’re so right about it being so neat and tidy. Love it! 😊
It’s really the only way I make chicken now. My new college grad (aka our new roomate!) now is cooking one dinner weekly and uses this recipe to make his dinners—as a matter of fact, this is what he requested for his birthday dinner!
Woohoo Laura – this makes me so happy!😊 It makes the juiciest chicken best evah! No more rubby chicken breasts, right?
You literally read my mind. Just 2 days ago I was hoping you would post how to best cook chicken breasts. And here it is! Can’t wait to try your method.
Yay! This is a method that once you use, you’ll use it over and over again! I’ve taught all my kids, their friends and more…it’s perfect for college students especially!
I would normally grill my chicken but as I’m renting right now and don’t have access to a grill I tried this recipe. I purchased seasoned chicken breast from the meat counter and pounded them out and followed this recipe (minus the salt and pepper). So simple and came out perfect with very little effort on my part. Roasted some potatoes and veggies and dinner was done! Thank you for sharing
Thanks Lynda – so happy that it’s working for you especially given the change in your living situation 😃I use this anytime I need chicken for anything like enchiladas or chicken salad. Love that you tried a seasoned chicken breast – I’ll have to do that next time! Miss you, my friend!
I also will put my chicken inside of a zip loc bag that is Almost closed and then pound it out. No splatter!
Great suggestion Stacey! Thank you!🤗
Thank you for this fool proof recipe!
You are welcome! Hope you liked it!